Showing posts with label Thangles. Show all posts

Thursday, November 5, 2020

15 minutes a day...

 I need to get my mojo back, so yesterday I committed to myself to do something sewing related for 15 minutes every day.  After work and dinner, I settled down with this quilt and worked on the binding.


I managed to get the same brown fabric (albeit in a flannel) to make a 2" binding. It has been attached for months now, and been a object of guilt for a while now. I don't now why, because I'm the recipient for a change!

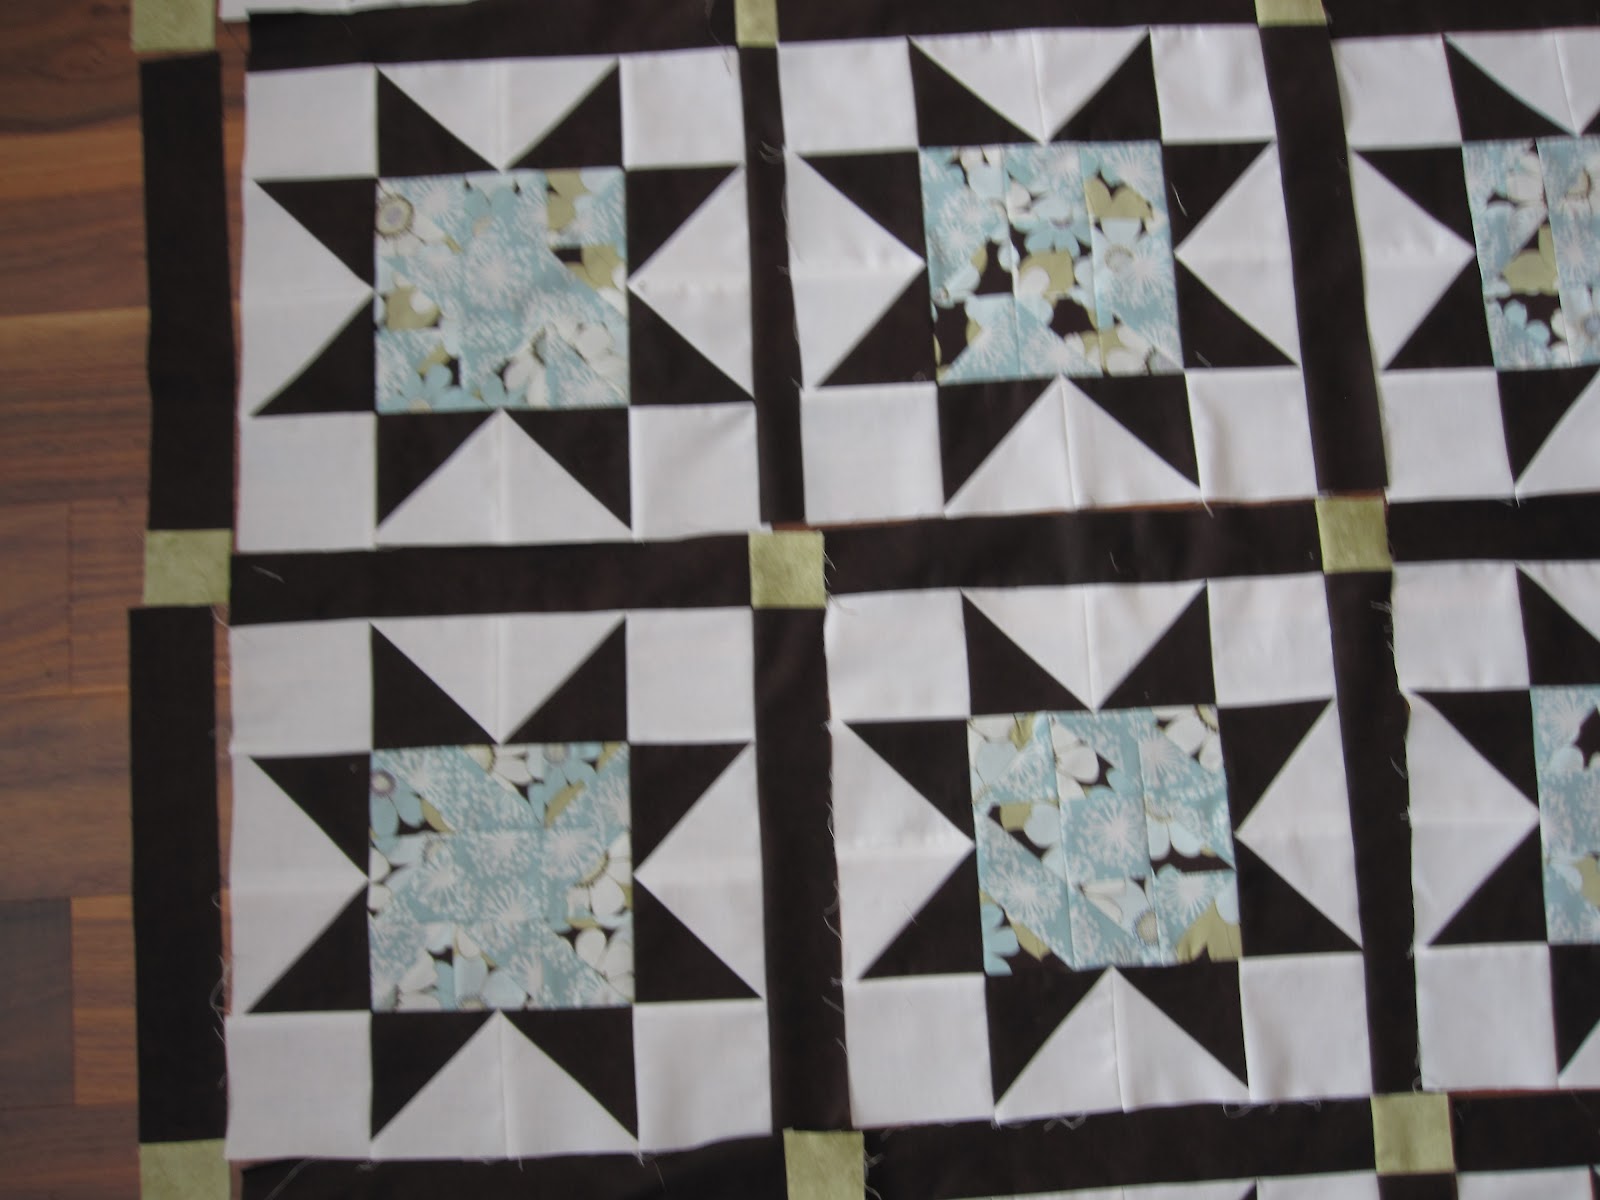
It started out as a Thangles block-of-the-month for the centre of the star blocks. There wasn't enough contrast between the two fabrics, so the centres look more like mush. 


I love the overall colours though, and the mint flannel backing so this one is destined to go on my bed in the spring. One day I hope to have a quilt for each season!

Of course, 15 minutes turned into 1 1/2 hours so I was able to get one side sewn down. Of course today, I remembered about flanged bindings - realizing if I had made one, I could have sewn the binding down by machine long ago!  Oh well - next time.

PS: It turns out I don't using Thangles so they are going into a giveaway box, to be dealt with at a later date.

15 minutes goal: 1 day out of 1    Total time: 1.5 hours

Ciao,

Terri


Thursday, January 1, 2015

Welcome 2015 - The year of UFOs!

Happy New Year, fellow quilters! My wish for all of you is a peaceful year filled with love, happiness and no drama - the same one I am hoping for. 
 
Last year was a difficult one, but it's now in the past. Today is a new year and in just a little bit, I'll be spending part of the day with my favourite little ones!
 
The only resolution I am making this year is to finish what I start. I need to do this with everything in my life, from housework to my job to my hobbies. Funny, I chose "Finish" as my word of the year last year, but didn't really do what I intended.  This year, I guess I'm repeating myself, but I will also add my other "words", Joy, Focus, Change. I feel like that dog in the movie "Up", Squirrel could be my nickname!
 
 
I'm going to update my UFO page later, but in the meantime I am picking 12 projects to focus on.  The first 12 are all completed flimsies, so it means I have to quit procrastinating and become more comfortable with doing my own quilting. Once they are done, I will pick 12 more and so on, until they are done! (yes, I have that many!)
 
In no particular order (click on the title for more info about the project:


This one is already sandwiched ready for quilting.


I have actually already started quilting this one, it will probably only take me a weekend to finish it.


This was a Thangles BOM project, unfortunately there wasn't enough contrast in the blocks so the patterns don't show up really well.  This one still needs a backing. 


I have finished the applique, sandwiched it, and have outlined the blocks.  Now I have to decide how I'm going to quilt it.


This top has been finished for some time now, it's time it got done.  I sandwiched it with a green cotton that has a "quilted" pattern on it that I plan to follow for the border.  I would do it all over except for that flange inner border - not sure how I will figure that out.


This is my latest Bonnie Hunter finish, I have a backing for it.  This one is destined for my grandson's bedroom. 


I've sandwiched this one twice, but stole the backing for another project once so had to redo it.  This one will be here at my house for the grandkids to cuddle up under. 


After 4 or 5 Christmases under the tree unquilted, I am determined this one will get done this year.  I have sandwiched once, but stole the backing and batting for another quilt.  Time to redo it.


Made 15 years ago when I first started back to quilting, it's about time to get this done.  My daughter wants it, so it will go to her (maybe in time for her birthday in March.


My first Leader and Ender project, this is made from 2" scraps dating back to the 70s (some of my mom's scraps.  This will be a play/picnic quilt at my house.


Sandwiched and ready to go - I even have the pillow form.
 
12. 6-Hour Quilt-as-you-go


Somewhere buried in this bucket of flimsies! Somehow I have never managed to take a picture of one of my oldest UFOs. About 15 years ago, when I started quilting again, I took a couple of classes.  I learned how to use rotary cutters (the best invention ever!), pieced the Pansy Rail Fence and then started a quilt-as-you-go. My machine did not like FMQ, so it got put aside and I've just never had the inclination to finish it. Since I have so many quilting projects that need to be finished, this will probably be a good one to start with, just to get the feel back. 
 
 Now that I have made my list, it's time to get sewing!  I plan to update my progress every two weeks.


Sunday, August 26, 2012

Joining UFO Sunday - hosted by Leah Day from The Free Motion Quilting Project

The last few weeks I've been beating myself up about the number of UFOs (UnFinished Objects) and WIPs (Works in Progress) I have on the go, but it hasn't stop me from starting more!  Let's face it - they are all UFOs in my house.  I'm pretty sure I suffer from QAD (Quilter's Attention Deficit). I'm putting a moratoriam on starting any more, unless they are a gift for a specific person for a specific date.  After all, I proved I can do that by making baby Brayden's quilt in just two sittings!  

Then last Sunday, I came across this post by Leah Day.  I think she was reading my mind. 

I love Leah's blog, The Free Motion Quilting Project.  I found her when I was searching how to free-motion quilt on my home machine (not that I've really tried much yet!).  She has terrific videos, goes into great detail and shares so much of how her mind works as she comes up with designs.  She also shares her personal history and how quilting has helped her, and as someone who also has had a difficult background, she has given me some great insight.

I've challenged myself to learn how to set up a new page (yay! done that) so I can list all my UFOs and I'm committed to UFO Sundays! And I've set up a separate page so I can list them all in one place, have links to their related posts, thereby tracking my progress and celebrate my finishes.

See my page here!

 Eventually, I want to have links on each name so I can go back and just see the posts related to that quilt.  I think might have to stop putting so much in to one post, and start posting more regularly with just one or two subjects.


This week's project - get my precious new-to-me Featherweight up and running! 

(Accomplished! and work done on an actual UFO - full story below if you want to read on!)


I purchased it six months ago, but have been afraid to use it until I dealt with this:


I'm scared of anything electrical (my sister lost her home to an electrical fire), and this was the original wiring, and there were exposed wires where the tape ended.  Major confession here - I have not even plugged it the machine since I bought it. So last Sunday, after making my UFO list, I put in a new light bulb, bravely anxiously plugged it in and flipped the switch.  NOTHING HAPPENED! OMG, what have I done?  Thrown away over $200 on a doorstop? I started googling and found out the switch only turns on the light, so obviously power wasn't getting to the light.  (PS: The Ebay seller was upfront and said she had no idea if it worked as it was her grandmother's and she had no idea how to use it.)

I googled some more, and decided I could handle looking inside the plug, after all I couldn't make it any worse. It was a mess, so what harm could I do?


 I got all the wires cut back and rewired in the right places (photos are so helpful at this point).  Plugged it in, and lo and behold the light came on!

I gingerly stepped on the foot controller and....NADA!  Still nothing.  I figured I would have to hunt for a new foot controller so back to Google I went.  I couldn't believe my luck - there was a Featherweight maintenance and repair workshop being held just 45 minutes from my home, across the border in Lynden, WA just 5 days later.  It was being put on by Tangled Threads and the teacher was none other than Dave McCallum from Featherweight RX, the author of "The Featherweight and I" and "Those Fantastic Featherweights".  According to everything I read, this is the guy who knows everything about Featherweights.  The only condition of the class was you had to have a running Featherweight.  I emailed Dave, explained my problem and asked if it would still be worth coming to the class.  I was surprised when he personally phoned me, and after talking, he assured me that it would definitely be worth my while to take the class, and even if it was full, to come anyway and he would get me up and running. I registered, went to the class on Friday and Dave plugged a new foot controller into my machine and just like that, my machine is running as smoothly as a brand-new machine.

It turned out I didn't even need to replace the foot controller - I just had to replace the power cord at a cost of $13.50!  If you own a Featherweight, I encourage you to buy his bundle which includes the book and DVD set.  It has everything we learned in the class and more, and well worth every penny.  You would never have to send your machine for service again, and I even learned some tips for my newer machines.  (No affiliation or compensation - I was just so impressed with the class and with Dave and his wife).

I was so excited I went home, pulled out the first UFO I could get my hands on (dating back to 2008), went to my friend's home and started sewing.


This is the first Thangles project I signed up for.  My LSS does one every year, and for $2/month you get 2 strips and the instructions to make one or two blocks.  I finished the flimsy of one in July and have two more to do.  This one is pink and green, the other one is black and rose.  I didn't participate this past year, because I had 3 unfinished.  I've promised myself if I get them all done this year, I could join again next year if one appeals to me (or not!).

Thanks for reading! 


Thursday, July 19, 2012

Trying something new!

I'm adding one more thing to my 3-things list, I have to sew for 20 minutes a day on something fun.  So today, I made one more block for my Farmer's Wife quilt-not-so-a-long. I'm up to 9 now.


Bowtie

Pardon the not-so-true colour, but it was 11 pm, when I took the picture.  For the first time, I tried double-stitching the corners to create HST blocks, but these babies are only 1 1/4" unfinished.  By the time I sew all four together, I will only get a 1 1/2" finished block - it would take an awful lot of those to make something with!  I think I'll just throw the cut-off triangles out if the bonus blocks turn out so small.

I didn't get the Thangles quilt top finished yet, all the rows (6) are together, so I just have to piece them together and add the outer border.  I'm setting aside an hour first thing Saturday morning for that, then I'm getting ready to do some machine quilting!


Sunday, July 15, 2012

Sunday Stash Report, Week 29

One thing about getting the housework done before sewing - my floors are now clean enough to do this!


I'm taking a break from piecing this top, which will be done today!  We have thunderstorms rumbling through and my dog, Daisy, is needing comforting (she kept getting under my foot while I was trying to sew).

I am counting it in as complete, as I am determined it will be done.  I have a stack of tops that need to be quilted and this one has to get off the table to make room!

Used this Week:  10.75 metres
Used year to Date: 60.75 metres
Added this Week: 0 metres
Added Year to Date: 49.15 metres
Net Used for 2012: 11.6 metres

It sounds like a lot for a lap quilt, but I used the total amount included in the kit, which included enough for the binding and the borders. By my calculations, there should be enough over left to piece almost the entire back, if not all.  It'll be like getting two quilts in one! Of course, that means I won't be able to add to my totals when it is completely finished, but now I'm accountable to getting it done!

I've taken the last row off, as it is too long and skinny for my tastes, and I want it as a lap quilt, so I don't need to make it wider.  I'll piece the extra blocks into the backing, so there won't be any waste.


(Pardon the blurry pictures and the bare toes - it was early when I took these pics!)

This was a kit, and the directions were not quite right (or I didn't cut them right - more likely!). I was short a few sashing strips.  But there is plenty left over, so I probably could have even made 6 more blocks if I wanted to make it twin-size.  I don't mind having leftovers, all the better to increase my stash for scrappy quilts.


Once I was able to get my "helper" out of the way,  I played with the blocks to make sure I didn't have two the same together.  Some of my blocks have decent contrast:


Some - not so much (I talked more about this here):


Since this was a mystery quilt and the fabrics were a kit, I had invested too much into it (both time and money) to make drastic changes, since it is just a lap quilt for me anyway.  I think once I have put it all together and finished the machine quilting, I going to outline the inner block shapes with some chunky handstitching in a dark brown perle cotton.  That will probably make them pop a bit more.

One thing about taking pictures, it makes it easier to spot mistakes.  Can you find which one of these blocks has one? This block has been culled to be placed on the back!


It has brightened up outside so hopefully the thunder has rolled away.  We rarely get thunder and lightning here, but it's been pretty unsettled since Friday.  We had one crack of thunder that right over head, and set off car alarms, and Daisy has been jumpy ever since.  One of the neighbours thinks the lightning hit the ground just around the corner but we didn't lose power or even have rain - although just 10 minutes away at the mall, they did!  Now that she has calmed down a bit, I'm going back to finish this top!

Sunday, June 24, 2012

Sunday Stash Report, Week 26


Not much progress in numbers this week, but lots of little bits done!  It feels good to get back to sewing again.

Used this Week:  .5 metres
Used year to Date: 46.5 metres
Added this Week: 0 metres
Added Year to Date: 45.9 metres
Net Used for 2012: 0.6 metres


My only finish wasn't even sewing, just pressing and cutting!  I loved paper dolls as a child, but they had fallen out of fashion by the time my kids were old enough in the 1980's and I couldn't find them anywhere.  Now that I have grandbabies, I was thrilled a couple of years ago when I found "Aunt Lyndi's Paper Dolls" fabric panels.  I finally got around to ironing them to fusible pellon, and cutting them out for Alex to play with.  They should last longer than paper, and Zoey won't be able to tear them up. As per usual, I'm linking up with Judy Laquidara's Patchwork Times for the weekly stash reporting!


I'm still plugging away on my Thangles quilt as leaders and enders.  As I'm assembling the blocks, I'm finishing the HSTs, only about 16 of 200+ left.  Then I have to start on the cornerstones and sashing.  I wish I had thought of this trick before I had them all cut Fast and Easy Sashing with Cornerstones

I couldn't find my Farmer's Wife book, so bad me, I started another project.  I've been collecting batiks for this Judy Niemeyer quilt pattern for a couple of years now, and the strips have been sorted into colour groups, so I finally started.  This is a long-term project so I don't have a deadline for it.  


I probably should have started my Christmas sewing list instead.  While I was cleaning up my sewing room looking for that darn book, I filled my Christmas basket - I'll post more about that later!

Finally, I found my book (under just 2 magazines), and I made the yellow and blue Wrench (Block #111).  Here's all my blocks so far.


I started thinking about sashing, so I could attach them as I go.  I'd love to do a black and white checkboard with bright cornerstones, but in order for the scale to look okay it would have to be 1/2" squares finished.  I made a sample and although I love the look, it would take forever.  


So now I'm on the hunt for a black and white checkerboard fabric with 1/2" squares  - any hints?

Monday, June 18, 2012

What's on my design wall - June 18, 2012

I need to spend more time in my sewing room, and less time on the couch, so I'm joining Judy Laquidera's Monday design wall posts in the hopes that I will get something done over the summer.


On the left is my Thangles 3 project, which has been a leaders & enders project, but now is moving to the front of the line.  There will be a total of 24 blocks with 2" wide sashing.  I call it Thangles 3 because I have a total of 3 Thangles Block-of-the-month projects that I've done religiously for about the first 3 months, then put aside.  1 & 2 still have to be done!

On the right are the blocks I've done so far on my Just Takes 2 quilt.  I randomly do the blocks depending on my mood, sometimes I want more of a challenge, and sometimes I just want fast.  I'm not sure how many of the blocks I'll actually do, as I'm not married to the design layout that has been presented for the first quarter.  As long as I'm enjoying making blocks, I'll continue - once I get tired of it, I'll start playing with my own layout.

I had first started my Just Takes 2 quilt in aqua and white, but the overall effect was kind of blah (lack of contrast).  I had made the first six blocks in aqua so tonight I put them together and started quilting a pillow for my sofa.


But after a full day of work, a meeting with a client this evening and an hour in my sewing room, I know when it's time to quit and go to bed!


Saturday, April 28, 2012

Just Takes 2 and a UFO

I'm making some progress on my Just Takes 2 blocks.  I have them all printed out, but reading on their website, it appears there may some issues with sizing on the foundation blocks.  I thought I noticed that last night when I was looking at one of the blocks and trying to figure out how to rotary-cut it instead.

Because I'm doing these blocks during my "stress-relief" time, so far I've been focusing on the easiest ones that can be assembled using pre-cut strips and rotary cutting techniques.  So far, this is what I've accomplished this week.


There is one thing I'm not crazy about the instructions - it's hard to figure out the finished size of some of the smaller HST and QST pieces so I can adapt them to rotary cutting using the Easy Angle and Companion Angle.  For the most part, they are there but buried in the instructions.


I'm not a big fan of the "Cut it Big and Whack it Off" club.  The best thing I've ever done for my piecing skills was participating in Bonnie Hunter's mystery quilt-along this past year.  I have gained so much confidence using the right tools and speed-piecing techniques. 

Here's my finished Pinwheel block -

(The block is straight - it's just the camera angle.) On the top, you can see my UFO leaders and enders.  I've even manage to start assembling a few blocks for that quilt as well.


Here's how I'm working with the Just Takes 2 blocks so far.  First, I cut a WOF strip from each colour (Kona Ruby and Bella White) in each of the following sizes:
1.5", 2", 2.5", 3", 3.5", 4", 4.5"

I had actually started out making little kits for each block, but quickly realized that I was using alot of the same size strips.  If I need an odd-size, such as 3 3/4", I just trim up a piece of a 4" strip.  There aren't many odd sizes, so I'm not worried about waste.

I'm also making a spreadsheet to track which blocks I've done, the name of the block and the inspiration quilt from the Infinite Variety show.  I plan on buying the catalog when it comes out and it will be great to have my references organized. Did you know you can download an app for your iPhone to view the show?

So far, I have bought 3 yards of the white (from fabric.com) and 2 metres of the red (from Hamels, my local quilt shop).  I didn't want to order the red online as I am very picky about what shade of red I like.  I prefer blue-reds, not orange-reds, and Ruby fit the bill!

All organized in my project box, all ready for the next blocks - which I'm off to do a couple more!


Saturday, May 28, 2011

What to do?

I want to make a quilt featuring these beautiful Sunkissed fabrics:


and have searching all month for just the right design,


and still have come up with nothing :o(


I think I'd like to have a pinwheel version


and have an idea in my mind - I might have to design my own!

In the meantime, I have been busy making a table topper:


with a flanged border,


finishing Block 1 of Vignette Magazine's mystery quilt (with liberal changes),


Finished 2 Block 4s of Thangles 4, my LQS buck-a-block program (here they are all together)


(they don't have enough contrast for my liking, but I'm persevering).

And I dug out my original Thangles I project, in the hopes of getting it finished this year!


And I'm still practicing free-motion quilting and finishing the quilting on my soon-to-be-born granddaughter's quilt!  She's due Wednesday, so I better get it done.